Wait for Response Before Continuing React js Fetch
Editor's note: This article was updated on 16 March 2022 to include the most recent updates to React Suspense before the release of React 18.
Managing data loading in a frontend application can get quite complex over time. So much so that there is a whole ecosystem of libraries dedicated to state management in a bid to combat it.
The React core team is aware of this, and have responded by working on a set of concurrent features to make data fetching in React easier. Suspense is among these, and it aims to simplify managing loading states in React components.
In this article, we'll look at how Suspense works by creating a simple app that fetches data from an API and renders it to the DOM.
Note: At the time this article was written, Suspense for data fetching was still experimental, and by the time it becomes stable, the API might have changed significantly.
Contents
- What is React Suspense?
- How to use Suspense
- Data fetching approaches
- Fetch-on-render
- Fetch-then-render
- Render-as-you-fetch
- Building a sample app with React Suspense
- Setup
- API
-
wrapPromise.js -
fetchData.js - API recap
-
- Components
- Index.jsx
- App.jsx
- UserWelcome.jsx
- Todos.jsx
- Managing rendering order with Suspense
- Recap
- Conclusion
What is React Suspense?
Suspense is a feature for managing asynchronous operations in a React app. It lets your components communicate to React that they're waiting for some data.
It is important to note that Suspense is not a data fetching library like react-async, nor is it a way to manage state like Redux. It simply lets you render a fallback declaratively while a component is waiting for some asynchronous operation (i.e., a network request) to be completed.
As we'll see further down, this allows us to synchronize loading states across different components to allow for a better user experience for users. It does this in a non-intrusive way that doesn't require a complete rewrite of existing applications.
How to use Suspense
Let's look at the simplest use case of Suspense, which is handling a pending network request in a component:
const [todos, isLoading] = fetchData('/todos') if (isLoading) { return <Spinner /> } return <Todos data={todos} /> This should look familiar, as it's how most people (me included) handle waiting for network calls. The implementation of the fetchData function, the Spinner, and Todos components are not relevant here.
A variable, isLoading, is used to track the status of the request. If true, we render a spinner to communicate to this state to the user. There's absolutely nothing wrong with doing it this way, but let's see how we'd handle this using Suspense:
const todos = fetchData('/todos') return ( <Suspense fallback={<Spinner />}> <Todos data={todos} /> </Suspense> ) There's a subtle but important change to the code. Instead of having the loading state as a state variable with logic to render a spinner based on the value, it's instead being managed by React using Suspense. We're now rendering a fallback declaratively.
In the previous example, React had no knowledge of the network call so we had to manage the loading state using the isLoading variable. With this example, React knows that a network call is happening, and by wrapping the Todos component in Suspense, it delays rendering it until the network call is done.
Another important thing to note is the fallback property passed to Suspense. This is whatever we want to render while waiting for the network call to finish. It could be a spinner, skeleton loader, or just plain nothing.
React will render whatever the value of fallback is while waiting for the network request to finish.
How exactly does React know that a network call is pending, though? Suspense as far as we've gone through only renders a fallback component while waiting. Where in the code do we communicate to React that we're making a network call?
This is where the data fetching libraries come in. Currently, Relay and SWR have integrations with Suspense to communicate loading states to React. I imagine more library authors will add integrations in the future.
What have we learned so far? Suspense gives React access to pending states in our applications. This allows us to render a fallback component declaratively while waiting.
Next, let's explore some common data fetching approaches, their limitations, and how Suspense improves the developer and user experience. Then, we'll build an app using Suspense to manage the loading states of the network requests. Finally, we'll tie it all together with a practical exploration of a few benefits that Suspense provides.
Data fetching approaches
If a React component needs some data from an API, we usually have to make a network request somewhere to retrieve it. This is where data fetching approaches come in to play.
Fetch-on-render
Using this approach, the network request is triggered in the component itself after mounting.
The reason it's called fetch-on-render is because the request isn't triggered until the component renders, and in some cases, this can lead to a problem known as a "waterfall." Consider the following example:
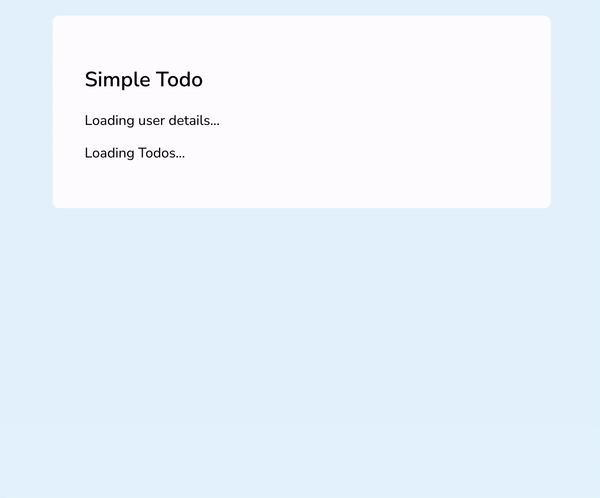
const App = () => { const [userDetails, setUserDetails] = useState({}) useEffect(() => { fetchUserDetails().then(setUserDetails) }, []) if (!userDetails.id) return <p>Fetching user details...</p> return ( <div className="app"> <h2>Simple Todo</h2> <UserWelcome user={userDetails} /> <Todos /> </div> ) } This looks awfully similar to what I would usually do when I have a component that needs data from an API, but there's a problem with it.
If the nested Todos component also needs to fetch some data from an API, it would have to wait until fetchUserDetails() resolves. If this takes three seconds, then <Todos/> would have to wait three seconds before it starts fetching its own data instead of having both requests happen in parallel.
Inspecting the networks tab shows this clearly, where the second request happens only after the first request is complete.

In a component with a fair number of other components that each make their own async calls, this could lead to a slow and janky user experience.
Of course, we could make the UserWelcome component handle its own data fetching, but the important concept here is the idea of coordinating network requests and, as we will see below, Suspense makes this a non-issue.
Fetch-then-render
Using this approach, we make the async request before the component is rendered. Let's go back to the previous example and see how we would fix it:
const fetchDataPromise = fetchUserDetailsAndTodos() // We start fetching here const App = () => { const [userDetails, setUserDetails] = useState({}) const [todos, setTodos] = useState([]) useEffect(() => { fetchDataPromise.then((data) => { setUserDetails(data.userDetails) setTodos(data.todos) }) }, []) return ( <div className="app"> <h2>Simple Todo</h2> <UserWelcome user={userDetails} /> <Todos todos={todos} /> </div> ) } In this case, we've moved the fetching logic outside of the App component so that the network request begins before the component is even mounted. Another change we made is that <Todos/> no longer triggers its own async requests. and is instead getting the data it needs from the parent App component.
Inspecting the networks tab clearly shows that both requests are started at the same time, but there's a subtle issue here that may not be so obvious at first glance.

Let's assume that fetchUserDetailsAndTodos looks like this:
function fetchUserDetailsAndTodos() { return Promise.all([fetchUserDetails(), fetchTodos()]) .then(([userDetails, todos]) => ({ userDetails, todos })) } While both fetchUserDetails and fetchTodos() are started in parallel, we would still need to wait for the slower request between the two to complete before we render any useful data.
If fetchTodos() takes 200ms to resolve and fetchUserDetails() takes 900ms to resolve, <Todos /> would still need to wait for an extra 700ms before it gets rendered even though its data is ready to go.
This is because Promise.all waits until all the promises are resolved before resolving. Of course we could fix this by removing Promise.all and waiting for both requests separately, but this quickly becomes cumbersome as an application grows.
There's also the fact that the parent component now has to manage state for UserWelcome and Todos. This doesn't scale very well both in terms of developer and user experience.
Render-as-you-fetch
This is arguably the most important benefit Suspense brings to React. This allows you to solve the problems we encountered with the other approaches in a trivial manner. It lets us begin rendering our component immediately after triggering the network request.
This means that, just like fetch-then-render, we kick off fetching before rendering, but we don't have to wait for a response before we start rendering. Let's look at some code:
const data = fetchData() // this is not a promise (we'll implement something similar) const App = () => ( <> <Suspense fallback={<p>Fetching user details...</p>}> <UserWelcome /> </Suspense> <Suspense fallback={<p>Loading todos...</p>}> <Todos /> </Suspense> </> ) const UserWelcome = () => { const userDetails = data.userDetails.read() // code to render welcome message } const Todos = () => { const todos = data.todos.read() // code to map and render todos } This code may look a bit foreign, but it's not that complicated. Most of the work actually happens in the fetchData() function, and we'll see how to implement something similar further down. For now, though, let's look at the rest of the code.
First, we trigger the network request before rendering any components on line one. In the main App component, we wrap both UserWelcome and Todos components in separate Suspense components with their own fallbacks.
When App mounts for the first time, it tries to render UserWelcome first, and this triggers the data.userDetails.read() line. If the data isn't ready yet (i.e., the re quest hasn't resolved), it is communicated back to Suspense, which then renders <p>Fetching user details…</p>. The same thing happens for Todos.
The fallback is rendered until the data is ready and then the components are rendered. The nice thing about this approach is that no component has to wait for the other. As soon as any component receives its complete data, it gets rendered regardless of whether the other component's request is resolved.
We retain the nice parallel network requests, and the rendering code also looks more succinct because we've eliminated the if checks to see whether the required data is present.

Now let's build a simple app to drive these concepts home and see how we can implement the fetchData() function above.
Building a sample app with React Suspense
We'll be building a simple app that fetches some data from an API and renders it to the DOM, but we'll be making use of Suspense and the render-as-you-fetch approach. I'm assuming you are already familiar with React Hooks; otherwise, you can get a quick intro here. All the code for this article can be found here.
Setup
Let's create all the files and folders and install the required packages. We'll fill in the content as we go.
Run the following commands to set up the project structure:
mkdir suspense-data-fetching && cd suspense-data-fetching mkdir -p lib/{api,components} public touch public/index.html public/index.css cd lib/ && touch index.jsx touch api/fetchData.js api/wrapPromise.js cd components/ touch App.jsx UserWelcome.jsx Todos.jsx Now let's install the required dependencies:
npm install [email protected] [email protected] npm install --save-dev parcel parcel-bundler
Notice that we're installing the "release candidate" versions of both react and react-dom. This is because Suspense for data fetching is not stable yet, so you need to manually opt in.
We're installing parcel and parcel-bundler to help us transpile our code into something that the browser can understand. The reason I opted for Parcel instead of something like webpack is because it requires zero config and works really well.
Next, add the following section in package.json:
"scripts": { "dev": "parcel public/index.html -p 4000" }, Now that we have our project structure ready and the required dependencies installed, let's start writing some code. To keep the tutorial succinct, I will leave out the code for the following files, which you can get from the linked repo:
-
index.html -
index.css
API
Let's start with the files in the api folder.
wrapPromise.js
This is probably the most important part of this whole tutorial, because it is what communicates with Suspense, and what any library author writing abstractions for the Suspense API would spend most of their time on.
wrapPromise.js is a wrapper that wraps over a Promise and provides a method that allows you to determine whether the data being returned from the Promise is ready to be read. If the Promise resolves, it returns the resolved data; if it rejects, it throws the error; and if it is still pending, it throws back the Promise.
This Promise argument is usually going to be a network request to retrieve some data from an API, but it could technically be any Promise object. The actual implementation is left for whoever is implementing it to figure out, so you could probably find other ways to do it.
The wrapPromise function has the following requirements:
- It takes in a Promise as an argument
- When the Promise is resolved, it returns the resolved value
- When the Promise is rejected, it throws the rejected value
- When the Promise is still pending, it throws back the Promise
- It exposes a method to read the status of the Promise
With the requirements defined, it's time to write some code. Open the api/wrapPromise.js file and we can get started:
function wrapPromise(promise) { let status = 'pending' let response const suspender = promise.then( (res) => { status = 'success' response = res }, (err) => { status = 'error' response = err }, ) ...to be continued... What's happening here? Inside the wrapPromise function, we're defining two variables:
-
status, which tracks the status of the promise argument -
response, which holds the result of the Promise (whether resolved or rejected)
status is initialized to "pending" by default, because that's the default state of any new Promise. We then initialize a new variable, suspender, and set its value to the Promise and attach a then method to it.
Inside this then method, we have two callback functions: the first to handle the resolved value, and the second to handle the rejected value. If the Promise resolves successfully, we update the status variable to be "success" and set the response variable to the resolved value.
If the Promise rejects, we update the status variable to be "error" and set the response variable to the rejected value.
...continued from above... const read = () => { switch (status) { case 'pending': throw suspender case 'error': throw response default: return response } } return { read } } export default wrapPromise Next, we create a new function called read, and inside this function, we have a switch statement that checks the value of the status variable. If the status of the promise is "pending," we throw the suspender variable we just defined. If it is "error," we throw the response variable. And, finally, if it is anything other than the two (i.e., "success"), we return the response variable.
The reason we throw either the suspender variable or the error response variable is because we want to communicate back to Suspense that the Promise is not yet resolved.
We're doing that by simulating an error in the component (using throw), which will get intercepted by the Suspense component. The Suspense component then looks at the thrown value to determine if it's an actual error or if it's a Promise.
If it is a Promise, the Suspense component will recognize that the component is still waiting for some data, and it will render the fallback. If it's an error, it bubbles the error back up to the nearest Error Boundary until it is either caught or it crashes the application.
At the end of the wrapPromise function, we return an object containing the read function as a method, and this is what our React components will interact with to retrieve the value of the Promise.
Lastly, we have a default export so that we can use the wrapPromise function in other files. Now let's move on to the fetchData.js file.
fetchData.js
Inside this file, we'll create a function to fetch the data that our components require. It will return a Promise wrapped with the wrapPromise function we just went through:
import wrapPromise from './wrapPromise' function fetchData(url) { const promise = fetch(url) .then((res) => res.json()) .then((res) => res.data) return wrapPromise(promise) } export default fetchData The first thing we do here is import the wrapPromise function we just created, and then define a function, fetchData.
Inside this function, we initialize a new variable, promise, and set its value to a Fetch request Promise. When this request is completed, we get the data from the Response object using res.json() and then return res.data, which contains the data that we need.
Finally, we pass this promise to the wrapPromise function and return it. At the end of this file, we export the fetchData function.
API recap
Let's go through all we have done so far. We defined a function, wrapPromise, that takes in a Promise and, based on the status of that Promise, either throws the rejected value of the Promise, the Promise itself, or returns the resolved value.
wrapPromise then returns an object containing a read method that allows us to query the value (or, if not resolved, the Promise itself). fetchData.js, on the other hand, contains a function that fetches data from a server using the Fetch API, and returns a promise wrapped with the wrapPromise function.
Now on to the components!
Components
We now have the "back end" for our app ready, so it's time to build out the components.
index.jsx
This is the entry point of our application ,and we'll be creating it first. This is where we'll mount our React app to the DOM:
import React from 'react' import ReactDOM from 'react-dom/client' import App from './components/App' const mountNode = document.querySelector('#root') ReactDOM.createRoot(mountNode).render(<App />) This should look familiar if you've ever worked on a React app, but there are two subtle differences with the way you would usually attach your app.
Firstly, we're importing ReactDOM from react-dom/client. which is the new way to do it in React 18. The reason is because the new version of ReactDOM also supports server-rendering so we have to be explicit in which package we're importing.
Secondly, is the way we use ReactDOM. Usually, we'd write something like this —
ReactDOM.render(<App />, mountNode)
However, this is now only valid for React v17 and below. Any higher and we need to use the createRoot method to render our application. This also allows us to manually opt in to using Concurrent features.
App.jsx
This is where most of the magic happens, so we'll go through it step by step:
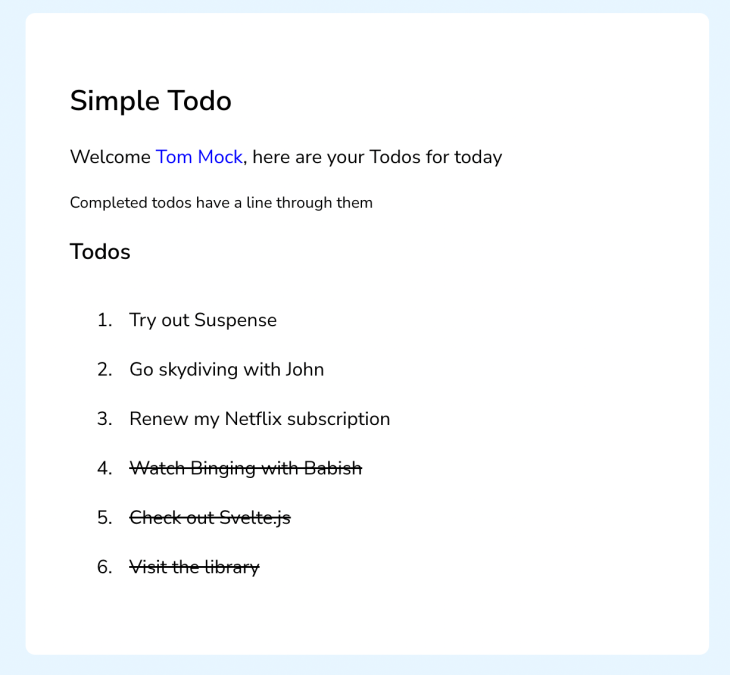
import React, { Suspense } from 'react' import UserWelcome from './UserWelcome' import Todos from './Todos' const App = () => { return ( <div className="app"> <h2>Simple Todo</h2> <Suspense fallback={<p>Loading user details...</p>}> <UserWelcome /> </Suspense> <Suspense fallback={<p>Loading Todos...</p>}> <Todos /> </Suspense> </div> ) } export default App Right at the beginning, we have our React import, but notice that we also bring in Suspense, which, if you remember, lets our components wait for something before rendering. We also import two custom components, which will render a welcome message for a user as well as some to-do items.
After the imports, we create a new component called App, which will act as the parent for the other components. Next, we have the return statement to render our JSX, and this is where we make use of the Suspense component.
The first Suspense component has a fallback of <p>Loading user details…</p> and is used to wrap the <UserWelcome/> component. This will cause React to render a loading message while the user details data is not ready.
The same things applies to the <Todos /> component, with the only difference being the fallback message. Notice that the two Suspense components are side by side. This simply means that both requests to fetch the pending and completed to-dos will be kicked off in parallel and neither will have to wait for the other.
UserWelcome.jsx
This component renders a welcome message to a user:
import React from 'react' import fetchData from '../api/fetchData' const resource = fetchData( 'https://run.mocky.io/v3/d6ac91ac-6dab-4ff0-a08e-9348d7deed51' ) const UserWelcome = () => { const userDetails = resource.read() return ( <div> <p> Welcome <span className="user-name">{userDetails.name}</span>, here are your Todos for today </p> <small>Completed todos have a line through them</small> </div> ) } export default UserWelcome We start off by importing React and the fetchData function at the top of the file. Then, we kick off our network request to fetch the user details and storing the result in a variable called resource.
This resource variable is an object with a reference to the request Promise, which we can query by calling a .read() method. If the request isn't resolved yet, calling resource.read() will throw an exception back to the Suspense component.
If it is, however, it will return the resolved data from the Promise, which, in this case, would be an array of todo items. We then go ahead to map over this array and render each to-do item.
At the end of the file, we have a default export so that we can import this component in other files.
Todos.jsx
This component renders a list of to-do items:
import React from 'react' import fetchData from '../api/fetchData' const resource = fetchData( 'https://run.mocky.io/v3/8a33e687-bc2f-41ea-b23d-3bc2fb452ead' ) const Todos = () => { const todos = resource.read() const renderTodos = todos.map((todo) => { const className = todo.status === 'Completed' ? 'todo-completed' : 'todo' return ( <li className={`todo ${className}`} key={todo.id}> {todo.title} </li> ) }) return ( <div> <h3>Todos</h3> <ol className="todos">{renderTodos}</ol> </div> ) } export default Todos It's very similar to the UserWelcome component above with the only difference being the render logic and content.
Now that we have both components ready, let's explore Suspense in deeper detail.
Managing rendering order with Suspense
Imagine if the Todos component gets its data first, and you begin to go through the list only for UserWelcome to resolve a little while later. The new content being rendered will push the existing to-do content down in a janky way, and this could disorient your users.
If, however, you want the Todos component to render only when the UserWelcome component has finished rendering, then you could nest the Suspense component wrapping Todos like so:
<Suspense fallback={<p>Loading user details...</p>}> <UserWelcome /> <Suspense fallback={<p>Loading Todos...</p>}> <Todos /> </Suspense> </Suspense> Another approach is to wrap both Suspense components in a SuspenseList and specify a "reveal order," like so:
<SuspenseList revealOrder="forwards"> <Suspense fallback={<p>Loading user details...</p>}> <UserWelcome /> </Suspense> <Suspense fallback={<p>Loading Todos...</p>}> <Todos /> </Suspense> </SuspenseList> Note:
SuspenseListis only available in the experimental version of React and not in the release candidate. To try it out, runnpm i [email protected].
This will cause React to render the components in the order they appear in your code, regardless of which one gets its data first.

You can begin to see how ridiculously easy it becomes to organize your application's loading states as opposed to having to manage isLoading variables yourself. A top-down loading style is much better.
Recap
We're done with coding our components, and it's time to review what we've done so far:
- We opted in to use concurrent features in our
index.jsxfile - We created an
Appcomponent that had two children components, each wrapped in aSuspensecomponent - In each of the children components, we kicked off our network request before they mounted
Let's run our app and see if it works. In your terminal, run npm run dev and navigate to http://localhost:4000 in your browser. Open the Networks tab in your Chrome developer tools and refresh the page.
You should see that the requests for both the completed and pending todo items are both happening in parallel like so.
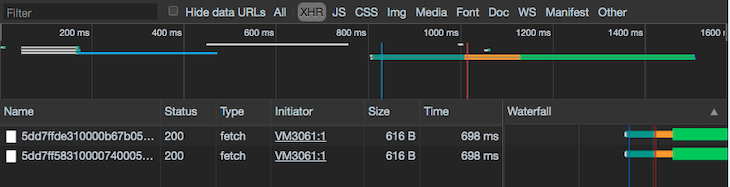
Look at the Waterfall section. We have successfully implemented a naive version of Suspense for data fetching, and you can see how it helps you orchestrate your app's data fetching operations in a simple and predictable manner.
Conclusion
In this article, we've taken a look at what Suspense is, the various data fetching approaches, and we've gone ahead and built a simple app that makes use of Suspense for data fetching.
While Concurrent Mode is still experimental, I hope this article has been able to highlight some of the nice benefits it will bring by the time it becomes stable.
If you're interested in learning more about it, I'd recommend you read the docs and try to build a more complex app. Again, you can find all the code written in this tutorial here.
Goodbye and happy coding! ❤️
Full visibility into production React apps
Debugging React applications can be difficult, especially when users experience issues that are hard to reproduce. If you're interested in monitoring and tracking Redux state, automatically surfacing JavaScript errors, and tracking slow network requests and component load time, try LogRocket. 

LogRocket is like a DVR for web and mobile apps, recording literally everything that happens on your React app. Instead of guessing why problems happen, you can aggregate and report on what state your application was in when an issue occurred. LogRocket also monitors your app's performance, reporting with metrics like client CPU load, client memory usage, and more.
The LogRocket Redux middleware package adds an extra layer of visibility into your user sessions. LogRocket logs all actions and state from your Redux stores.
Modernize how you debug your React apps — start monitoring for free.
Source: https://blog.logrocket.com/react-suspense-data-fetching/
Belum ada Komentar untuk "Wait for Response Before Continuing React js Fetch"
Posting Komentar